Are you one of the many facing challenges with Netflix’s new password policy due to frequent travel, living in college dorms, or serving as active duty military abroad? If so, you’re not alone, and thankfully, there are technical solutions to help lessen these inconveniences.
One effective solution is using a Virtual Private Network (VPN). This tool allows your mobile devices to connect back to your home network, providing access to resources or, in this instance, enabling you to use your home internet connection. As a result, services like Netflix interpret your browsing activities as coming from your home.
There’s a wide variety of OpenVPN platforms and other VPN protocols available to choose from. A simple check of your home router’s specifications should tell you if this feature is supported. With a little bit of setup, you can keep your Netflix service uninterrupted.
These directions allow friends and family to do the same.
These directions are limited to if the Netflix device is a Windows or Mac computer; there are ways to configure a site-to-site VPN which would allow the same for all devices on a network but which requires more setup.
Part 1: Setting up the Asus Router for OpenVPN
Step 1: Access the Router Configuration Panel
Connect your device to your Asus router and open a web browser. Enter the router’s IP address in the URL bar. Typically, this address is 192.168.1.1 or 192.168.0.1. Login to the router’s configuration panel with your username and password.
Step 2: Navigate to VPN Settings
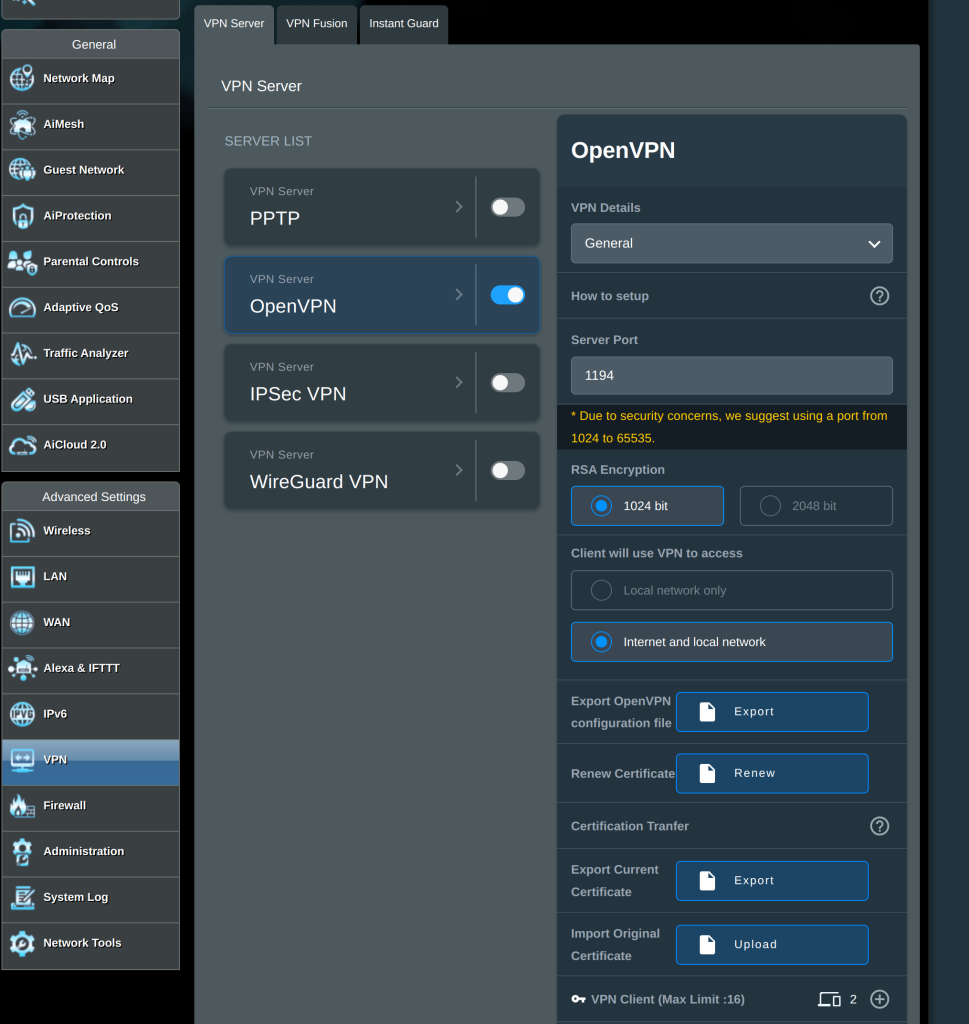
In the router’s configuration panel, navigate to the “VPN” section in the left-hand menu. Select “VPN Server” tab.
Step 3: Enable OpenVPN
Click on the “OpenVPN” tab, and then click on the “Enable” radio button. This turns on the OpenVPN server.

Step 4: Configure OpenVPN
Select “Internet and local network”; this option routes the endpoint’s internet access through the VPN.
Set a server port 1194 is the default OpenVPN port, but choosing anything that is not blocked by your ISP will work.
Create any number of users that you require using the plus sign to assign usernames and credentials.
Step 5: Create and Export OpenVPN Configuration File
Click on the “Export” button next to “Export OpenVPN configuration file”. This will download a .ovpn file that you will need to set up your Windows or Mac workstations.
Part 2: Setting up Windows/Mac Workstations for VPN Access
Windows
Step 1: Install OpenVPN Clienteel free
Download and install the OpenVPN client from the official OpenVPN website.
Step 2: Import .ovpn file
Copy the .ovpn file from your router to your Windows machine, then start the OpenVPN client, click on “File” and then “Import.” Select the .ovpn file that you just copied.
Step 3: Connect to the VPN
After importing the file, you can connect to the VPN. Enter your router’s login credentials when prompted.
Mac
Step 1: Install Tunnelblick
Download and install Tunnelblick, an OpenVPN client for Mac.
Step 2: Import .ovpn file
Copy the .ovpn file to your Mac. Open Tunnelblick, click on “VPN Details”, then “Add”, then “Add Configuration”. Choose the .ovpn file you copied.
Step 3: Connect to the VPN
You can now connect to the VPN from the Tunnelblick interface. Enter your router’s login credentials when prompted.
You have now configured your Asus router as an OpenVPN server and set up your Windows and Mac workstations for VPN access. All your internet traffic is now securely routed through your home network. Enjoy secure and private internet browsing from anywhere in the world!

Leave a Reply